Monday, August 4, 2014

Lunches for Back to School or Homeschool

I wanted to introduce you to my 2 little beauties:


I am not going to use their names. Instead they will go by nicknames. Meet Darth Vader (his choice...he's 4 and into Star Wars!) and Princess (she is 2). Darth Vader starts Pre-K this fall with Classical Conversations and supplementing with Confessions of a Homeschooler K4 program. Princess is going to be doing the basics of Erika's Letter of the Week program with tot ideas filled in.

With this being said, I was trying to find some interesting new "real food" ideas on Pinterest. On Mondays we will take our lunch and have it at Classical Conversations. The rest of the week will be at home. I found the most awesome pin from 100 days of Real Food blog. She has a list of 100 different school lunch ideas so you don't always have to pack the dreaded PB&J or turkey or ham. I am super excited!!

We tried out her first one today (we subbed cornbread zucchini mini muffins because that's what we had) and the kids loved it!! Check out her site and let us know what your favorites are or if you have a special lunch you like to make. 

Amanda

Friday, August 1, 2014

Dollar store Organization!!

So in an effort to rid the living room of some mess that I'm sick of looking at, I have been going crazy on Pinterest trying to figure out how I can organize cheap. I am also sick of the "Honey, where is the TV (blue ray, wii, etc) remote...I can't find it!!!"  Then I realized that everyone has been using 3M command hooks to hang baskets for various reason. Here is my take on cheap organization!!

This was the before:


And this is the after:


I am super excited because now I don't have to worry about controllers falling and cords being everywhere!! And, I have a spot for the remotes. Now when someone asks where is a remote I can say check the basket. Ahh, the little things that excite us. 

I used:
1 green basket-$1 from Dollar Tree
1 pkg of 3M hooks that each hold 3 lbs- about $2 from Target (I already had them so I'm guessing $)

Yay...for under $5 I got some super organization done!!

Happy Organizing!!

Amanda


Saturday, May 17, 2014

Old Fashioned Whole Wheat Bread


Yummy yummy in our tummy!! I found the recipe for this awesome whole wheat bread about a month ago via Pinterest from a website called Deals to Meals and I made a few modifications.  I made it hoping my family would like it because frankly I am sick of paying for bread. I had to find a recipe that wasn't baked in the bread machine because they come out too crusty and giant for my little ones. This size is perfect for little hands and hearty but yet moist. 

So, thankfully this recipe isn't in the bread machine nor do you have to hand knead it. I hope you enjoy it and it becomes a family favorite for you as well. 

This recipe makes 2 loaves. I use a stoneware loaf pan and a regular metal pan. 

Ingredients:

3.5 cups whole wheat flour
1 1/4 Tbsp yeast
2.5 cups hot water (I use very warm water from the tap. If the water is too hot it will kill the yeast)

1 Tbsp salt
1/3 cup oil (I've used olive oil and coconut oil and both worked fine)
1/3 cup honey or 1/2 cup sugar
1 1/4 Tbsp lemon juice
2 1/4-2 1/2 cup whole wheat flour

Directions:

1. Combine first two ingredients in stand mixer with a dough hook. 
2. Add water all at once and mix for 1 minute; let rest for 10 min. This is called sponging.
3. Add salt, oil, honey (or sugar) and lemon juice and beat for 1 minute.
4. Add remaining flour, 1 cup at a time, beating between each cup. 
5. Beat for about 6-10 minutes, until dough pulls away from the sides of the bowl. This makes very soft, non sticky dough..
6. Meanwhile, pre-heat oven to your lowest setting (mine is 170F) and place an oven safe container with some water on the bottom rack. 
7. Turn off mixer and place dough onto a greased surface (truth us I spray a section of my counter with cooking spray). Divide dough into 2 loaves and placed in OILED bread pans.
8. Turn oven off just before you put the loaves in. Let rise in warm oven for 20-30 minutes; until dough is at or almost at top of pan. 
9. Do not remove bread from oven; turn oven on to 350F and bake for 25 minutes. 
10. Remove from pans and cool on racks. 

When I put the dough in the bread pans, I squish it into the corners of the pan so that it is even on the bottom of the pans. Next time I make it I will take a picture of what they look like before I put them in the oven. 

Let me know if you are able to do this in a bread machine on a dough cycle. I am interested if it turns out the same!!

Happy Baking!!

Amanda

Wednesday, May 14, 2014

Easy Tasty Homemade Ravioli

I am so excited to share this recipe.  I can't believe how easy it was to make.  Yes, there is some arm work involved.  But you can make up a big batch at once and then have several dinners in no time. I found the recipe from Better Homes and Gardens via Pinterest and made a few changes.

Lets start with, I posted on my Facebook profile that before I could start this post I had a mountain of dishes to do before I could sit down and write this out.  This is what a day of dishes, plus baking 26 muffins, plus making ravioli looks like (doesn't included the stoneware muffin pan or the dishes that went in the dishwasher):


I also want everyone to know that I do not have an elaborate kitchen.  I am not doing this old fashioned living with some fancy food show kitchen.  We live in a small 1200 sq ft townhouse that I make do with because we are content for the time being.  Just because I have a small kitchen, I haven't let it hinder what I love to do.  Here is where I prepare all of my creations:


So, lets get on with the cooking (or freezing).  I want you to know: THEY DO NOT HAVE TO BE PERFECT!! These are homemade ravioli.  Do not stress yourself out. They are not coming from a machine that punches them out perfectly every time.  I had square, kinda rounded, and even triangle-ish.  I believe, the more not processed they look, the better they taste.  Remember: these are HOMEMADE.

I set them on the baking sheet when I was done making them until I cooked them.

Ingredients:

  • 1.5 cups all purpose flour (you could also sub 1/2 cup for whole wheat)
  • 2 eggs
  • 1/4 tsp Salt
  • 1 Beaten Egg
  • 1 Tbsp water

Directions:


1. In a food processor, combine flour, 2 eggs, and salt. Cover and process until well mixed. If necessary, with processor running, add 1 to 2 tablespoons water through feed tube until mixture forms a dough. Remove dough and shape into a ball. You can also mix this using a stand mixer if you don't have a food processor.
2. On a lightly floured surface, knead dough about 1 minute or until smooth. Cover dough and let stand for 30 minutes.
3. Divide dough into 3-4 portions, depending on how big and thick you want the ravioli to be.
4. On a lightly floured surface, roll each portion into a 12-inch square. This is where I was saying don't stress.  Look at my pics and you can totally tell that I didn't have a perfect square! If necessary, trim the sheet into a square with a small sharp knife. Dough will be right at or almost paper thin.


Yes...that is a rolling pin if you've never seen one before!!

Yep...totally nowhere near a square!

I trimmed it to make it a square.

5. Cut your rolled-out pasta dough into two-inch-wide strips using a sharp knife or a pastry wheel for ruffled edges. I learned in x-ray school that about 3 fingers is 2".

I made a little slit at the top with a sharp knife every 2"


Then I cut it the legnth
6.Brush the dough strips lightly with a beaten egg and Tbsp of water mixed (i.e. egg wash). This will help form a seal.

I know it's hard to tell, but it does have egg brushed on the dough.
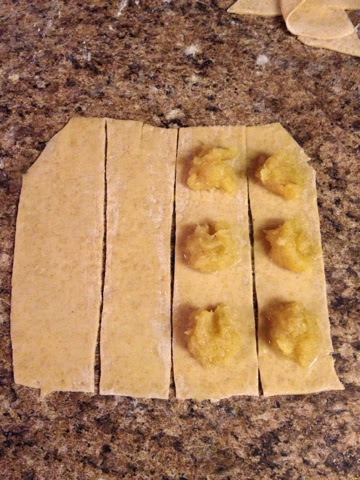
 7. Fill the ravioli by dropping the filling at 1-inch intervals along two of the strips. I used about 1 tsp of acorn squash for each ravioli.


8. Cover the ravioli filling with another strip of dough.

9. Press down firmly on the top strip of dough to seal the edges around the filling. It's ok if some of the filling comes out when you are pressing down.  Just try to contain it as best as you can.


10. Cut each ravioli from the strip using the pastry wheel (or sharp knife). And you're done! This recipe made 21 ravioli for me.


Cut and Ready to be used!!!
Now you have to make a decision: Use immediately or freeze??

Use immediately:
1. Bring a pot of lightly salted water to a boil.
2. Drop in  about half of the ravioli, depending on the size of your pot.  You don't want to crowd them together because you don't want them to stick together.


3. Boil for 3-4 minutes.
4. Enjoy topped with your favorite sauce!!

Freeze:
1.Spray a pan or baking sheet (one that will fit in the freezer)..
2. Lay the ravioli flat on pan or baking sheet, without touching.

Before freezing
3. Put in the freezer for 30 minutes (this is called flash freezing; it will prevent the ravioli from sticking together in the freezer).
After Flash Freezing
4. Remove from the freezer and put on a labeled bag. Make sure bag is labeled with contents, date, and how to cook them. When you want to enjoy them from the freezer, just follow the cooking instructions above except boil for 5-6 minutes.


There are endless possibilities for filling homemade ravioli.  Some of our favorites or ones we want to try are:
  • Spinach with Italian seasoning and feta cheese
  • Sweet potato
  • Cheese
  • Sweet Italian Sausage
  • Pumpkin
If you have a favorite, please share.  We are always up for trying new things.

Happy Cooking!!

Amanda

Monday, May 12, 2014

Quick yummy glazed Carrots

I HATE carrots...emphasis on the word hate!! My kids love cooked carrots. So I had to find a recipe that I was willing to eat as a side dish; seeing as I grow carrots, plus we get them in our CSA basket. I am not willing to grate carrots all the time for baking just to get them used up.


So I found this wonderful recipe that I wanted to share. When I make these (and their super easy), it's the first thing gone on everyone's plates!!

Ingredients:


2 large carrots
1/4 cup butter
1/4 cup brown sugar
1/4 tsp salt
1/8 tsp white pepper

Directions:


1. Cut up carrots into sticks. 
2. Put in a pot with about 1" of water (do not completely cover carrots; you are more steaming rather than boiling them). 
3. Bring carrots to a boil, cover, turn to low and simmer for 8 min. 
4. Drain water. Put back on burner and add butter, brown sugar, salt, and white pepper. Allow to cook until butter is melted. Stir and you're done!!


Kids had them with lunch today and they were gone before I knew it!!

Happy cooking!!

Amanda