Showing posts with label meal planning. Show all posts

Saturday, May 17, 2014

Old Fashioned Whole Wheat Bread


Yummy yummy in our tummy!! I found the recipe for this awesome whole wheat bread about a month ago via Pinterest from a website called Deals to Meals and I made a few modifications.  I made it hoping my family would like it because frankly I am sick of paying for bread. I had to find a recipe that wasn't baked in the bread machine because they come out too crusty and giant for my little ones. This size is perfect for little hands and hearty but yet moist. 

So, thankfully this recipe isn't in the bread machine nor do you have to hand knead it. I hope you enjoy it and it becomes a family favorite for you as well. 

This recipe makes 2 loaves. I use a stoneware loaf pan and a regular metal pan. 

Ingredients:

3.5 cups whole wheat flour
1 1/4 Tbsp yeast
2.5 cups hot water (I use very warm water from the tap. If the water is too hot it will kill the yeast)

1 Tbsp salt
1/3 cup oil (I've used olive oil and coconut oil and both worked fine)
1/3 cup honey or 1/2 cup sugar
1 1/4 Tbsp lemon juice
2 1/4-2 1/2 cup whole wheat flour

Directions:

1. Combine first two ingredients in stand mixer with a dough hook. 
2. Add water all at once and mix for 1 minute; let rest for 10 min. This is called sponging.
3. Add salt, oil, honey (or sugar) and lemon juice and beat for 1 minute.
4. Add remaining flour, 1 cup at a time, beating between each cup. 
5. Beat for about 6-10 minutes, until dough pulls away from the sides of the bowl. This makes very soft, non sticky dough..
6. Meanwhile, pre-heat oven to your lowest setting (mine is 170F) and place an oven safe container with some water on the bottom rack. 
7. Turn off mixer and place dough onto a greased surface (truth us I spray a section of my counter with cooking spray). Divide dough into 2 loaves and placed in OILED bread pans.
8. Turn oven off just before you put the loaves in. Let rise in warm oven for 20-30 minutes; until dough is at or almost at top of pan. 
9. Do not remove bread from oven; turn oven on to 350F and bake for 25 minutes. 
10. Remove from pans and cool on racks. 

When I put the dough in the bread pans, I squish it into the corners of the pan so that it is even on the bottom of the pans. Next time I make it I will take a picture of what they look like before I put them in the oven. 

Let me know if you are able to do this in a bread machine on a dough cycle. I am interested if it turns out the same!!

Happy Baking!!

Amanda

Wednesday, May 14, 2014

Easy Tasty Homemade Ravioli

I am so excited to share this recipe.  I can't believe how easy it was to make.  Yes, there is some arm work involved.  But you can make up a big batch at once and then have several dinners in no time. I found the recipe from Better Homes and Gardens via Pinterest and made a few changes.

Lets start with, I posted on my Facebook profile that before I could start this post I had a mountain of dishes to do before I could sit down and write this out.  This is what a day of dishes, plus baking 26 muffins, plus making ravioli looks like (doesn't included the stoneware muffin pan or the dishes that went in the dishwasher):


I also want everyone to know that I do not have an elaborate kitchen.  I am not doing this old fashioned living with some fancy food show kitchen.  We live in a small 1200 sq ft townhouse that I make do with because we are content for the time being.  Just because I have a small kitchen, I haven't let it hinder what I love to do.  Here is where I prepare all of my creations:


So, lets get on with the cooking (or freezing).  I want you to know: THEY DO NOT HAVE TO BE PERFECT!! These are homemade ravioli.  Do not stress yourself out. They are not coming from a machine that punches them out perfectly every time.  I had square, kinda rounded, and even triangle-ish.  I believe, the more not processed they look, the better they taste.  Remember: these are HOMEMADE.

I set them on the baking sheet when I was done making them until I cooked them.

Ingredients:

  • 1.5 cups all purpose flour (you could also sub 1/2 cup for whole wheat)
  • 2 eggs
  • 1/4 tsp Salt
  • 1 Beaten Egg
  • 1 Tbsp water

Directions:


1. In a food processor, combine flour, 2 eggs, and salt. Cover and process until well mixed. If necessary, with processor running, add 1 to 2 tablespoons water through feed tube until mixture forms a dough. Remove dough and shape into a ball. You can also mix this using a stand mixer if you don't have a food processor.
2. On a lightly floured surface, knead dough about 1 minute or until smooth. Cover dough and let stand for 30 minutes.
3. Divide dough into 3-4 portions, depending on how big and thick you want the ravioli to be.
4. On a lightly floured surface, roll each portion into a 12-inch square. This is where I was saying don't stress.  Look at my pics and you can totally tell that I didn't have a perfect square! If necessary, trim the sheet into a square with a small sharp knife. Dough will be right at or almost paper thin.


Yes...that is a rolling pin if you've never seen one before!!

Yep...totally nowhere near a square!

I trimmed it to make it a square.

5. Cut your rolled-out pasta dough into two-inch-wide strips using a sharp knife or a pastry wheel for ruffled edges. I learned in x-ray school that about 3 fingers is 2".

I made a little slit at the top with a sharp knife every 2"


Then I cut it the legnth
6.Brush the dough strips lightly with a beaten egg and Tbsp of water mixed (i.e. egg wash). This will help form a seal.

I know it's hard to tell, but it does have egg brushed on the dough.
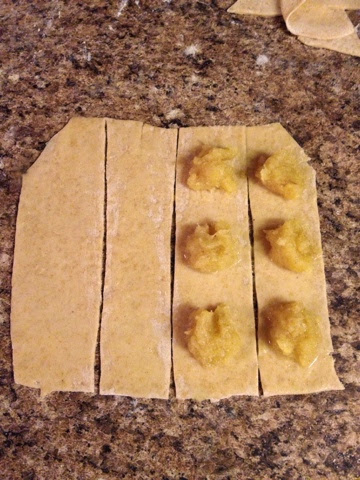
 7. Fill the ravioli by dropping the filling at 1-inch intervals along two of the strips. I used about 1 tsp of acorn squash for each ravioli.


8. Cover the ravioli filling with another strip of dough.

9. Press down firmly on the top strip of dough to seal the edges around the filling. It's ok if some of the filling comes out when you are pressing down.  Just try to contain it as best as you can.


10. Cut each ravioli from the strip using the pastry wheel (or sharp knife). And you're done! This recipe made 21 ravioli for me.


Cut and Ready to be used!!!
Now you have to make a decision: Use immediately or freeze??

Use immediately:
1. Bring a pot of lightly salted water to a boil.
2. Drop in  about half of the ravioli, depending on the size of your pot.  You don't want to crowd them together because you don't want them to stick together.


3. Boil for 3-4 minutes.
4. Enjoy topped with your favorite sauce!!

Freeze:
1.Spray a pan or baking sheet (one that will fit in the freezer)..
2. Lay the ravioli flat on pan or baking sheet, without touching.

Before freezing
3. Put in the freezer for 30 minutes (this is called flash freezing; it will prevent the ravioli from sticking together in the freezer).
After Flash Freezing
4. Remove from the freezer and put on a labeled bag. Make sure bag is labeled with contents, date, and how to cook them. When you want to enjoy them from the freezer, just follow the cooking instructions above except boil for 5-6 minutes.


There are endless possibilities for filling homemade ravioli.  Some of our favorites or ones we want to try are:
  • Spinach with Italian seasoning and feta cheese
  • Sweet potato
  • Cheese
  • Sweet Italian Sausage
  • Pumpkin
If you have a favorite, please share.  We are always up for trying new things.

Happy Cooking!!

Amanda

Monday, May 12, 2014

Quick yummy glazed Carrots

I HATE carrots...emphasis on the word hate!! My kids love cooked carrots. So I had to find a recipe that I was willing to eat as a side dish; seeing as I grow carrots, plus we get them in our CSA basket. I am not willing to grate carrots all the time for baking just to get them used up.


So I found this wonderful recipe that I wanted to share. When I make these (and their super easy), it's the first thing gone on everyone's plates!!

Ingredients:


2 large carrots
1/4 cup butter
1/4 cup brown sugar
1/4 tsp salt
1/8 tsp white pepper

Directions:


1. Cut up carrots into sticks. 
2. Put in a pot with about 1" of water (do not completely cover carrots; you are more steaming rather than boiling them). 
3. Bring carrots to a boil, cover, turn to low and simmer for 8 min. 
4. Drain water. Put back on burner and add butter, brown sugar, salt, and white pepper. Allow to cook until butter is melted. Stir and you're done!!


Kids had them with lunch today and they were gone before I knew it!!

Happy cooking!!

Amanda

Friday, May 2, 2014

May 2014 Menu


Yay for me.  I haven't gotten a menu out since December.  I have been battling a long recovery from my relapse I had with my MS in February.  I am doing better and life is slowly getting back to normal around our house.  I love spring and can't wait to post pics of how my garden is doing.  A lot of what I am cooking this month comes either from the garden or my CSA basket that started up 4 weeks ago!! That has really helped save on buying produce at the store.


May  2014 Menu

The link above is a word document of this months meal plan.  A lot of the recipes came from my Pinterest board Favorite Recipes.  I decided to give my cook books a rest this month (plus I didn't feel like getting them out) and see what I could find that I've been pinning the last few months while I've been on the mend. Hope you enjoy the ideas.

Happy Cooking!!

Amanda

Wednesday, April 30, 2014

Quick Easy Chicken Parmesan

This post is basically how I made dinner for my family of 4 for $8.  Yep...I typed that right...$8.00!! That included the chicken parmesan, salad, and crescent rolls.

I will start with, I am not an extreme couponer.  But I do try to find deals when and where I can.  I got chicken real cheap a few weeks ago (like $1.99/lb and since we get a military discount I got it for $1.79/lb).  I got the pasta for $0.39 a box using a coupon and it was on sale. I got the tomato sauce and diced tomatoes on sale for $0.88 each.  The crescents I got on sale with a coupon as well a few weeks ago and were $1.76.  I already had the cheese leftover and the salad I got fresh from my garden. Hope you like this recipe...we loved it !

Chicken Parmesan

Ingredients:
  • 1 can (15 oz) Tomato Sauce
  • 1 can (14.5 oz) Diced Tomatoes with Basil, Garlic, and Oregano, undrained
  • 6 tbsp. grated Parmesan cheese, divided
  • 4 thin sliced boneless skinless chicken breasts (1 lb)
  • 1 box spaghetti, uncooked
  • 1.5 cups shredded mozzarella cheese

*The pepper was for the salad

Directions:

1. Heat oven to 375 degrees.
2. Pour tomato sauce and undrained tomatoes into a 13x9-inch baking dish.


3. Stir in 1/4 cup (4 Tbsp.) Parmesan cheese.


4. Add chicken; turn to coat evenly both sides of each breast with sauce. Cover.


 5. Bake for 30 minutes or until chicken is done (165 deg). Meanwhile, cook spaghetti as directed on package, omitting salt.
6. Top chicken with remaining cheeses; bake, uncovered, for 5 minutes. Drain spaghetti. Serve topped with chicken and sauce.


Happy Cooking and Saving!!

Amanda

Saturday, February 8, 2014

Broccoli, Potato and Cheddar Cheese Soup

I apologize for my blog absence.  We have had a rough start to our year with some illness setbacks.  When someone tells you that sickness spreads through a family like wildfire, it's true!! My daughter got sick around the new year, then my son got it only worse, then my husband got it, and finally I got a mild case of it.  Just as we were getting over that, my son got the stomach flu and that went around.  We were all sick off and on for 3 weeks in January.  When some of my symptoms weren't going away, I went to the doctors (my neurologist) and found out that through all of the sickness, I was also having a relapse with my MS.  Thankfully I am doing well now.  I am hoping to jump back into my blog because right now is an exciting time!!

Since we were all sick,  I was doing a lot of soup.  I  had some broccoli on hand that needed to get used and I was also needing to go grocery shopping, so this was a "what can I make with what I have" kind of soup.  I hope you like it.  It was so very yummy!!

Broccoli, Potato and Cheddar Cheese Soup


 Ingredients:
  • 3.5 cups of broccoli florets (I use fresh from the store that I cut up
  • 1 small onion, chopped finely
  • 3 Tbps butter or margarine
  • 2 medium potatoes cubed
  • 2 cups of milk
  • 1 cup of water
  • 2 Tbsp flour
  • 1/2 tsp dried basil
  • 1/4 tsp black pepper
  • 3 handfuls of Cheddar Cheese (I just put it in by the handful instead of measuring it out)
1. In a large saucepan over medium heat, melt the butter.
2. Add in the broccoli and onion. Saute until tender, about 5 minutes. Stir to prevent burning.


3. Add in the Potatoes and milk.  Stir the flour into the water, breaking up clumps until well blended.
4. Add the water with flour, basil, and pepper to the pot.  Stir until blended. Bring to a boil; cover and simmer for 15-20 minutes, or until potatoes a tender but not mushy.
5. Stir in the cheese and let cook for 5 more minutes until cheese is well blended.


I hope you enjoy this recipe.  If the soup comes out too thick, you can thin it with some milk.  Remember to add less flour the next time.  If the soup is too thin, add some more cheese.  Remember to add a little more flour the next time you make it. 

I am hoping to get some gardening stuff out in the next few days.  I have already started some of my plants inside.  We have a fairly long growing season here in Southeast Virginia, of which I am thankful for!!

Happy Cooking!!

Amanda

Wednesday, January 1, 2014

Artisan Bread

What could possibly be better than homemade bread?? How about homemade NO KNEAD bread!! We absolutely love this bread.  It is so easy to make and is so very yummy.  We use it for a lot of different reasons: french toast, soup bowls, dinner bread, and dips. I got the recipe off of a website a few years ago that right now I can't think of where. I hope you like it as much as we do!!

Homemade Artisan Bread


Ingredients:
  • 6 cups warm water
  • 3 Tbsp yeast
  • 3 Tbsp Kosher salt
  • 13 cups unbleached flour (you can use any all purpose flour, I just like my unbleached)


1. In a large bowl or mixer bowl (I use my kitchen aid mixer, makes mixing easier), combine water, yeast, and salt.  Mix until combined.

2. Add in flour and mix until well combined.  Dough will be a little sticky.

3. Now if you hand stirred it, then just cover and let rise for 2 hours.  If you used a mixer, transfer to a large bowl, cover, and let rise for 2 hours at room temperature. Dough should double in size.

4. Cut off a grapefruit sized piece of dough.  You want to pull all sides, one at a time, to the bottom to form a ball. Flour hands if dough is sticking to them. Don't worry about making the bottom of the loaf look smooth.

5. Set "loaf" pieces on an un-greased  baking sheet or pizza stone (whatever you're going to bake it on), and let it rise for 40 min more.


6. While loaf is rising, you want to pre-heat the oven to 450 deg. During the last 20 minutes of rising, put a pan with 2 cups of water on the bottom rack of the oven.


7. When loaf or loaves are done rising, sprinkle a little flour on top.  Using a serrated knife, cut an X in the top of each loaf.


8. When loaf, or loaves, are done rising you want to make sure no one is around because this step is quick.  You have to open the oven door and quickly put the loaf or loaves in the oven without letting much steam escape.  The steam helps bake the bread.

9. Bake bread for 30-40 minutes or until crust is browned and hardened.

10. Remove from oven.  If using right away, allow to cool before cutting so essential moisture isn't released.


11. If you are going to package it up, I put each loaf in a gallon ziploc bag after they have completely cooled and then throw them in the deep freezer.


You don't have to make up all the dough at once.  If you want to just have it with dinners, then after the initial 2 hour rising cover the dough and put it in the fridge.  When you want to use it, follow steps 5-10.  It is good in the freezer for up to 14 days.  We mostly use it for french toast once a week so I bake it up all at once and then I don't have to worry about it.

Happy Baking!!

Amanda

p.s. Don't forget to check back tomorrow for January's menu and a surprise!!

Tuesday, December 3, 2013

Our Thanksgiving Menu


Wow did November pass right by!! I can't believe Thanksgiving is done and Christmas is almost here.  Thankfully I have almost all of my Christmas shopping done!

I've looked back at the last month and realized that I didn't get much out on the blog.  Craziness was happening around here with a birthday and a holiday and just the busy-ness of the season. I do still want to get some yummy fall recipes out so that maybe you will still be able to use them.

Sunday, December 1, 2013

December 2013 Menu


YAY!! I got this months meal plan out when I wanted to.  I am so happy that I can share this months plan.  Comfort food is now in full swing at our house.  That doesn't mean, however, that it is always bad for you.  I am so thankful for our large turkey that we got from my husbands father.  We will have turkey for awhile!! Some of the meals are the last of the "double" meals I made over the last few months.  I am also thankful for the venison that we were blessed with from my in-laws.  I hope that tomorrow you enjoy the recipes I plan on posting!!

 
December Meal Plan

The link above is a word document of this months meal plan.  A lot of the recipes came from friends and family recipes and allrecipes.com.  I like to get ideas for side dishes fro All Recipes.  They have 1000s of recipes that people have uploaded.

Again, be sure to come back tomorrow for a lot of Menu Monday recipes that will be posted!! Hope you enjoy our menu this month.

Happy Cooking!!

Amanda

Saturday, November 9, 2013

November 2013 Menu

I meant to get this out a week ago but time has passed me by with everything I have had going on.  I didn't have much to add to this months menu because I had some double meals from last month and meals I made from last months basket produce.  Plus we have a holiday coming up and I will have leftovers from that!! Right now is my favorite season of them all.  I love all the fall flavors and produce available, especially pumpkins:) I hope you enjoy what we are enjoying at our table!

Monday, November 4, 2013

Berry Pretty Pork Roast


Wow, where did October go!! Thank you everyone that started following me last month.  I really appreciate your interest in how we live.  I hope that I was able to give you some ideas for your own family. I took a break this past week to help get my kids ready for Halloween and just to have some family time.

Now, on with the recipe. We weren't able to have our scheduled dinner last Sunday, so we had it yesterday.  I really wanted to try this recipe because we love berries.  I have berries in the freezer that we picked in the spring and summer.  Just a tidbit, if you make this recipe it is ok to use frozen berries.  Nutritiously they are just as good as fresh berries, and are cheaper!! I also saved money by buying the roast in bulk.  I have a membership at a local wholesale store and they had a package of two 2.5 lb pork roasts on sale.  So I froze them last month.  We had one yesterday and one for December.


So again, on with the recipe:


Ingredients:

  • 1 whole boneless pork loin roast (about 2.5 lbs)
  • 1/2 cup chopped dried plums (prunes)
  • 1/3 cup each fresh or frozen blueberries, blackberries and sliced strawberries
  • 1 garlic clove
  • 1/4 cup butter or margarine, melted
  • 1/2 teaspoon dried oregano
  • 1/4 teaspoon salt
  • 1/4 teaspoon pepper
  • 1/2 cup red wine or chicken broth (I used cooking sherry)
  • 1 Tbsp brown sugar
  • 2 Tbsp strawberry jam (NOT jelly)

1. I start by getting everything ready and within reach.  It makes this recipe go a lot smoother.

2. Slice prunes into 4 quarters. Put prunes and rest of fruit in a bowl.


 3. Cut garlic clove into slivers.


4. Get yourself a LARGE cutting board to put the roast on; you will need it:)


5. Cut a horizontal slit through the center of the pork roast to within 1/2 in. of the opposite side; open roast so it lies flat.


6. Place fruit on top of the right side of the pork roast.


7. Fold left side of roast over the berries, trying to keep berries contained.  Don't worry if some fall out, you can stuff them back in after the next step.


8. Tie the roast securely with kitchen string (or I used thread doubled up).

9. Cut slits in the roast; insert garlic slivers.


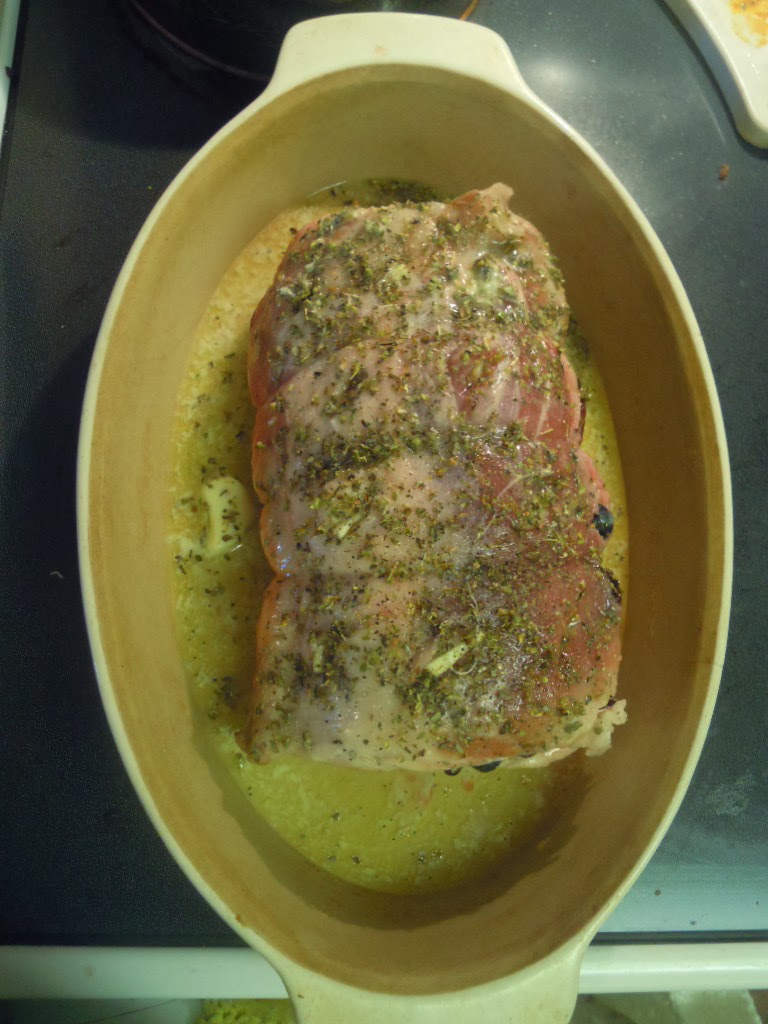
10. Place in an ungreased shallow baking pan. Drizzle with melted butter. Sprinkle with oregano, salt and pepper.


11. In a small bowl, combine the wine or broth, brown sugar, and jam.  Drizzle over roast (I took the time to kind of spoon it over so that the spices didn't get poured off).

Haha...forgot to take pic before I put it in the oven!!
12. Bake, uncovered, for 75-80 minutes or until meat thermometer reaches 160 deg.


13. Let stand for 10 minutes before slicing.


We served this with rice and mashed sweet potatoes.  I would definitely say this is a weekend meal because of the prep time and length of time to cook.  I do hope that you enjoy this recipe...it kind of gives a last hooray to summer while bringing  in the goodness of autumn.

Happy Cooking!!!

Amanda

Wednesday, October 23, 2013

Tidbit Tuesday...on Wednesday

The topic this week is...the secrets behind how I feed my family of 4.5 for 6 weeks on $300!!! (I have a step-son who is here part of the time so I count him as .5 on my grocery list)

Most of you have seen my menu for October, so you know what I am having to eat every day. If you haven't, head on over here. You may not know all the ingredients, but you have an idea as to what I need for most of them.  And some of my recipes I have already post so you do know some of it.

Menu Monday...on Tuesday

So sorry this is late.  I didn't have a chance to get this out yesterday.  I am doing a ton of towels for a craft fair this Saturday, like 3 dozen, and that has taken priority over the last 36 hours.  But I did want to get a yummy recipe out there for you from my menu this week.  I am not showcasing last night's dinner because we ended up having leftovers due to some afternoon running around.  Thankfully, I took pictures of Sunday's dinner, Spanakopita.  I really hope you enjoy it!!

Friday, October 18, 2013

Italian Sausage & Lentil Stew

Today's post is all about freezer cooking.  I learned about this 2 years ago when I was pregnant with my daughter.  WOW is all I can say.  Learning this has taken a lot of hassle out of dinner.  I've even learned how to save big bucks with this technique.  If it is a meal we really like, then I double the recipe and freeze half.  If it is a big meal (serves more than 4-5) then I automatically divide into 2 smaller pans and freeze half!! Wow...where was I when all this information first came out??

So today I give you one of my family's favorite winter stew...because it is keeping with the tradition of the week: IN SEASON!!


Ingredients:
  • 1 lb sweet Italian sausage
  • 2 large carrots, sliced (in season)
  • 1 large onion, chopped (about 1 cup)
  • 2 cloves garlic, minced (I use my garlic press, it's just easier)
  • 4 cups Chicken or Vegetable broth
  • 2 tsp dried oregano leaves or 2 Tbsp chopped fresh oregano
  • 1 bay leaf
  • 2 cups cubed red potatoes (in season)
  • 1 cup dried Lentils
  • 1/2 bunch fresh Kale (in season)

1. Spray a skillet with cooking spray and heat over medium-high heat.  If sausage is still in casing, removing casing.  Cook sausage like you would cook ground beef, making sure it's well browned. Pour off any fat.
Sausage with casing removed

Sausage fully cooked

2. Put sausage in a large pot (I use my trusty stockpot). Add carrots, onion and garlic and cook until vegetables are tender.
My trusty Stockpot!!

My garlic press I use for "minced" garlic

3. Stir in the broth, oregano, bay leaf, potatoes and lentils.  Heat to a boil.  Reduce heat to low.  Cover and cook for 40 minutes.
with everything added together

4. Meanwhile, grab leaves from the kale bunch and pull the leaves from the main vein (each leaf will have a tough main section going down the middle, known as the vein.  If you don't like it, then pull the leaf away from it).  Coarsely rip the leaves and set in a bowl to the side.
what a bunch of Kale looks like

5. When 40 min is done, dumb the Kale on top of the stew and put lid back on.  Set timer for 5-7 minutes more or until Kale is slightly wilted.  Stir Kale into stew. **Remember, before you serve or freeze, REMOVE THE BAY LEAF**
Just dumb Kale in

after 5-7 min, Kale looks wilted

Finished stew!!

Like I mentioned, we love this stew.  The only thing the little ones sometimes pick out is the Kale.  We usually serve ours with bread and butter or dinner rolls. 

TO FREEZE:
Let stew cool in pot and then divide between plastic containers.  Label and freeze.  To reuse, thaw in fridge overnight and then just throw in a pot at dinner time until heated up.
I got 2 dinners and 1 lunch!!!

I hope you enjoy this recipe, as the weather is getting cooler.  Kale is a wonderful leafy green, in season right now, that is very delicious and healthy for you.  We actually got a bunch in our CSA basket today!! If you missed my post on CSA's, click here!!

Happy Freezing!!

Amanda